Menu

Riding over poles can be varied and create some extra challenges in daily training, both for the horse and the rider. But don't we tend to always do the same thing? We lay out one, two, or maybe three poles and create a distance that suits one of the horse's gaits. And that's about it. Have you ever considered that pole work can be SO much more rewarding? Told with a good old cliché, it's actually only imagination that sets the limits. And if you're lacking in that department, help is fortunately available right here.
We have drawn inspiration from the book Creative Riding With Obstacles and found three creative pole exercises that can benefit any pair – show jumpers, dressage riders, western riders, Icelandic horse riders, and certainly many more. The exercises can improve your horse's balance, strength, and flexibility even better than the classic use of poles and help the horse to keep attention on the rider's signals. The exercises do not have to be performed in one specific way, and you can certainly develop your own ways of riding them. Nevertheless, we give you a couple of options along the way, which vary a bit in difficulty. So you're well on your way.
Using poles to form a fan is nothing new. But have you ever thought of using them to practice a perfect serpentine line, snake arch, or to optimize your figure eights? By creating several fans turning in each direction, you can train precision and balance, which is especially good just before a competition.

Create a fan consisting of four poles, where you lay the first pole so that it lies perpendicular to the long side. Build the fan by laying the other poles so that they point more and more towards the short side, as shown in the picture. Adjust the distance between the poles in the middle of them so that they fit your horse's trot. Usually, a distance of 1-1.5 meters is used for that. If you ride over the poles right at the center, you can walk over. If you ride at the outermost, you can canter. If you want to make it more difficult, you can create another fan 5-10 meters next to it. Its center should be in line with the other fan, but it should be made exactly the opposite, so the poles point towards the opposite long side. On a normal riding arena, you can make up to four fans depending on how close you lay them. You can also lay two fans in the middle of the riding arena, so they form a snake arch.
Read also: The Blanket – A hidden source of injury
Difficulty 1 – Circle: Make a circle over a single fan. To make it a bit more difficult, you can practice it in all three gaits, where you set off in respectively trot and canter right after you have come over the poles. In this way, you can make three circles in all three gaits right after each other. It's a good way to practice canter departures and steering of the horse.
Difficulty 2 – Serpentine line and figure eights: If you make two, three, or four fans that are always opposite each other, you can create a serpentine line through them. The closer they are, the more difficult it becomes. It's a super exercise for training serpentine lines and figure eights.
Difficulty 3 – Serpentine line with circles: To practice your horse's responsiveness and perhaps teach it to wait for you, you can make a circle after each fan. Thereby, you create a serpentine line that is constantly interrupted by a circle. If you can also switch between the gaits in the circles, you're really cool. For example, you can ride walk-trot-walk-trot or walk-trot-canter-trot through four fans with a circle between each.
The 'U' is often used as an exercise to improve the horse's ability to turn for the rider’s leg aids – and it's certainly good for that! But here we'll use it a bit differently. It can be used at many difficulty levels – from ordinary riding over poles to lateral movements and backing exercises.

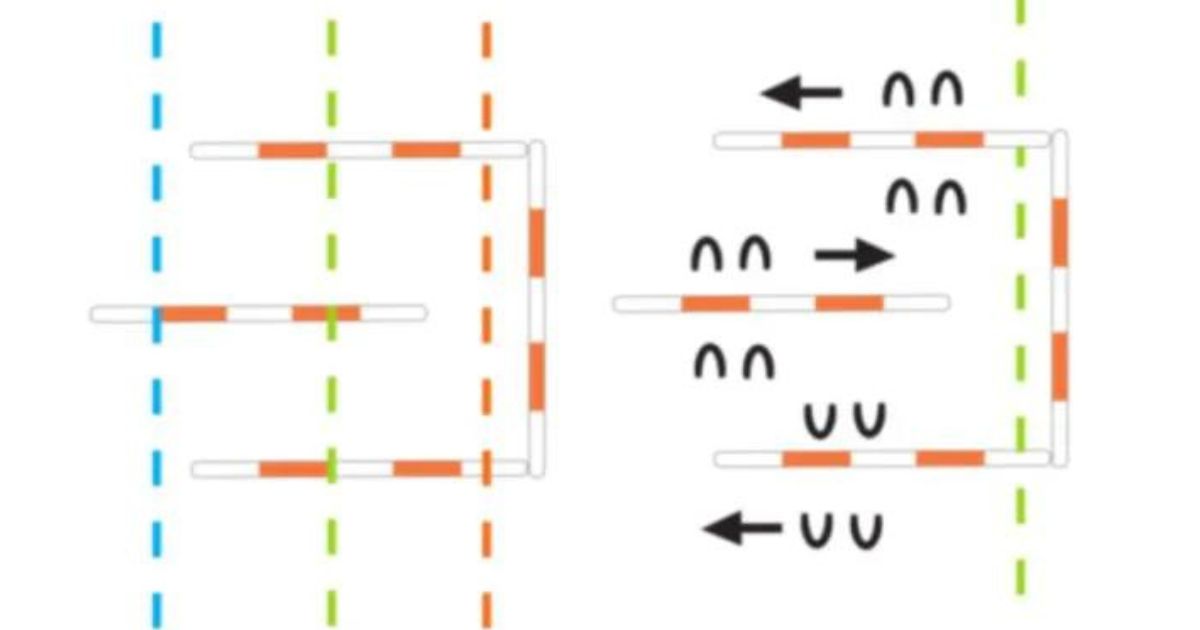
Form a 'U' with three poles and place another pole in between. This one should stick out about a third longer than the two poles it runs parallel to. The distance between the three parallel poles should be a short trot distance or a large walk distance. If you want to better tailor the distance to your horse's trot or do the exercises in canter, you can create more space between the poles than what is shown in the illustration. If you choose to raise one or more of the poles to a cavaletti or a jump, the distances may need to be slightly larger.
Read also: Liberty Training - Do you dare lose control?
Difficulty 1 – Poles in All Gaits: The smartest thing about the 'U' is that you can ride over one, two, or three poles without having to lay out more than four (or three, if you remove the one that lies across). Additionally, you can use the poles in all three gaits. If you ride over the 'U' from the side, you can trot or briskly walk over the poles in the middle. You can also ride over respectively one and two poles on the sides – and you can do this in walk, trot, and canter.
Difficulty 2 – Poles and Cavaletti: To make working with the poles more challenging, you can raise one or two of the poles to a cavaletti. By making the "bottom" of the 'U' a cavaletti (or maybe a proper jump?), you can use the poles around to steer the horse straight. If you make a cavaletti out of the middle pole, you can practice your horse's distance judgment and improve its use of the back, as there is a pole both before and after the jump.
Difficulty 3 – Lateral Movements: The most challenging exercise is here. Can you get your horse to move sideways over the poles without touching them? It will probably take quite a bit of practice, but it can be good for improving the horse's responsiveness to your leg aids and weight. You can also try to ride sideways across the 'U', so the horse has to lift its legs over the poles. Needless to say, you should probably start in walk?
The last exercise actually doesn't even consist of poles but of cones or jump supports, depending on what you have available. The good thing about the jump supports is that they don't tip over as easily as cones. The downside is that they are somewhat heavier to drag out onto the riding arena. Therefore, we'll leave it up to you what you choose.

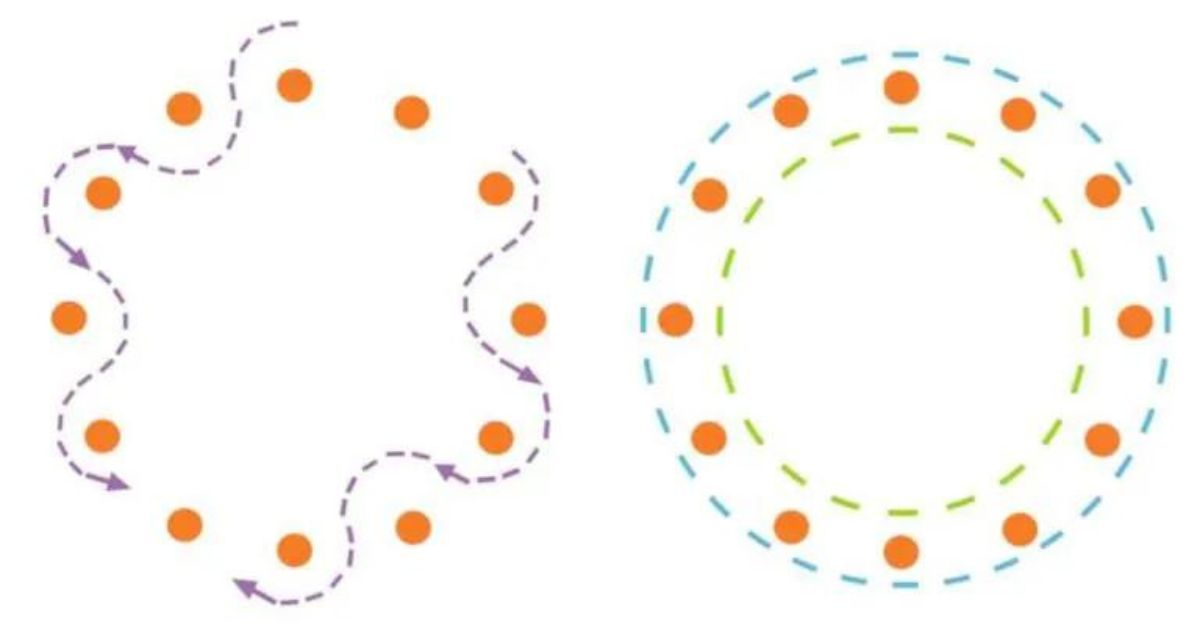
Place supports or cones around a circle with about 2 meters between each. There should be at least two meters to the hoof print, so you can get around. The most optimal is to use 10-12 cones, but if you have a small riding arena, you can certainly use fewer. The exercise should preferably be done in walk and trot, but can also be done in canter if the distance between the cones is increased by an extra meter or two. You can check if the wheel is completely round by measuring the length of the diameter one way and the other way (like a cross) with your steps.
Read also: 3 creative pole exercises that can benefit any pair
Difficulty 1 – Inner and Outer Circles: Use the cones to frame your circles by riding outside or inside the cones. If you make an inner circle, the cones support your outer side. If you make an outer circle, the placement of the cones helps you to make it completely round.
Difficulty 2 – Half Slalom: You can also choose to ride slalom between half of the cones. After doing so, ride through the circle, as if you were drawing a diameter through it. Then you can make slalom through the other half and even do it the other way around. In this way, you intensively train the horse's bending and responsiveness to your leg aids on both circles.
Difficulty 3 – Slalom: You can, of course, also ride slalom all the way around. First one way, then ride through the circle and repeat the other way around. Maybe you dare to try in canter?
If you and your horse have got a taste for it and want to do even more creative pole exercises, you can find a total of 160 of them in the book, written by Lina Zacha and Barbro Lagergren.